

ON THE TRAIL OF THE THYLACINE? WE TEST THE BLAZEVIDEO A280W TRAIL CAMERA ON OUR PROPERTY

On this great island continent of Australia new species of fauna are being discovered every year. From tiny but colourful jumping spiders to long lost birds and marsupials.
And one of these days we might even re-discover the Thylacine, our Tassie Tiger, given some reported sightings here and there…
We just don’t know what all is “out there” unless we set up some camera traps.
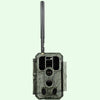
BlazeVideo was kind enough to send us one of their trail cameras which are great for detecting and recording wildlife.
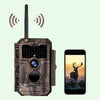
Their latest BlazeVideo A280W Trail Camera has motion activated night vision, excellent resolution for photos (up to 32MP), videos (up to 1296P) and timelapse. Plus WiFi.

GUESS WHAT WE SAW WHEN WE INSTALLED IT?
Before we get to that let’s go through the unpack and setup whilst we take note of the features in this inexpensive unit.
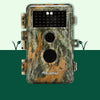
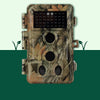
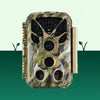
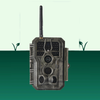
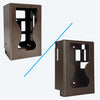
Trail cameras – of which there are many makes and models – all look pretty much the same outwardly: they are boxy and big and come with a variety of camouflage patterns.
It’s the innards that make them different: how they are powered (batteries, solar), motion detection specs and trigger times, resolution (1080p for video should be the minimum) and how they communicate with us (WiFi or cellular or just by taking the SD card out or connecting the cam with your computer via USB).
On that last choice we opted for WiFi so that we can adjust settings on the cam without having to open the unit. Same with downloading the footage. Just get into range with your phone and see what happened in your backyard when you were asleep.
Even though trail cameras are primarily used by hunters or wildlife enthusiasts, nothing stops you from using them as security cameras as well. In that case, I would go for the cellular option as you can get notifications the moment the camera detects motion.

SETUP
Our first impressions of the BlazeVideo A280W were very good: the unit looks solidly made, easy to use and has a subtle camouflage pattern.
Here is a word of praise for the manual that comes with it: for a product that’s made in China the manual is not in Chenglish where you have to figure out what the instructions actually mean.
What’s more, this little booklet is very clearly written and well-illustrated with colour photos. Kudos!
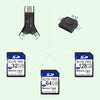
It pays to get to know all the various functions even though it will work as soon as you put in the SD card and the batteries.
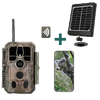
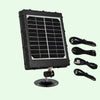
This unit came with the optional Solar powerpack which we will review separately as it deserves its own space, being suitable for a multitude of uses.
The battery compartment holds 8 AA batteries which should be good for a few weeks of recording.

Switch the unit on and a 2.4 inch colour screen welcomes you.
We check the various default settings via the Menu button and select our own parameters.
A neat feature of the photos taken is that they contain an info strip that shows the temperature and the phase of the moon in addition to the time stamp.
THE APP
With WiFi and the latest Bluetooth you can easily connect to the cam with your phone and check the live camera view (important to ensure the camera is properly aimed at the scene you want to capture).
Under the Status tab you’ll see the number of images taken and battery life.
The Gallery allows you to see the pics taken and download the interesting ones to the phone.
So, changing Settings via the app is handy. Initially though, I made the changes using the dedicated buttons on the unit. Just like you would on a DSLR…
A heads up: if you have an ad blocker, like my beloved Adguard, you must temporarily disable the adblocker for the app to connect.
FIRST TRY-OUT PICTURES
I secured the A280W to a pergola beam next to the veggie garden with the amply long strap.
You can also use the tripod socket (kinda makes the unit much more visible and it could be kicked around by wildlife…) but you could also screw it into some sort of gorilla grip for hanging off a branch. I had done this later on when there were only small saplings to fasten the unit to.
Having it close by allowed me to quickly change some of the options via the app to set the detection delay to 0 for faster capture and adjust a few other parameters.
Now it’s time for the big test where I put the trail cam at the edge of the woods near a paddock, right next to a frequented wildlife path.

WHAT DID WE CATCH ON THE FIRST NIGHT?
The result of the first 24 hours was not disappointing but somehow predictable.
We saw a rabbit, a fox and plenty of kangaroos.
Two things we found by looking at the images: the animals seemed to have noticed the camera or the lingering scent of a human being where I hung up the cam. They all looked at the camera for a prolonged time. One roo posed at least 30 secs in front of the lens and (too) close to it.
The other thing: even though I had everything set for fastest triggering and enabled the 2 side motion sensors, the videos picked up the animals only when they were halfway in the view.
Might have to see if we can tweak that a bit.
The second day added a bevy of parrots to the mix, the lone fox made an appearance again as well as some galloping kangaroos in the night.
A roo with joey in her pouch also showed up and we discovered that the rabbit we spotted before now has two playmates! I knew they multiply fast, but this fast?!
It really is exciting to see all the wildlife and how they act when nobody is looking… At least that’s what they think…
FURTHER TESTING
Over the next couple of weeks we experimented with different placements, like our dam, where we saw some ducks, and the creek where we encountered some interesting nightlife. Including what looked like either a huge rat or some marsupial cousin…
At the moment of writing, we’ve installed the A280W as a security cam and wired it up with the solar panel. It will pick up the many roos around the homestead and perhaps catch any intruders.
Later on, we plan to use the time-lapse feature as well.
ANY IMPROVEMENTS?
Whilst the A280W is an amazing tool and the best unit BlazeVideo has brought to the market, there are a couple of suggestions I can think of to make it even better.
When wildlife gets too close (less than 1 metre) to the lens the animals become a bit fuzzy. I would love to see a lens that’s sharp over 50-100cm as well.
Another point: even faster triggering. Animals and people often don’t get picked up at the very beginning of the video even though the side motion sensors are enabled.
And lastly, a cellular (4G LTE) unit for Australian customers would be very welcome. They have them in North America and it would be great to have them here as well.
WHY WE RECOMMEND THE BLAZEVIDEO A280W TRAIL CAMERA
It’s an inexpensive yet high quality unit to observe wildlife and anything else that moves.
It’s exciting to dash out every morning and see what the trap has caught. And like fishing, you’ll never know what specimen will surprise you one day…
So for less than 150 Aussie bucks you can get one here with free shipping in Australia.
In the couple of weeks we’ve been playing with the BlazeVideo A280W we have not spotted the Thylacine (yet) and I’m OK with that as we don’t want our property overrun by journos, tourists or hunters…
But if we do find some real surprising stars in our videos we’ll update this article.
In the meantime, we’ll be publishing Part II of this review very soon where we check out the Solar Panel Kit that came with the BlazeVideo.

And finally, enjoy this 3-minute compilation of our local wildlife. No background music here but the sounds of nature itself.
-Posted by Martin Regtien From digitalreviews, Sep 9, 2022
Leave a comment